
DIY Harness Bralette
- Miaira Jennings

- Oct 29, 2017
- 3 min read
Spice up your low-cut tops with this trendy, easy to make DIY strappy harness bralette!

Step 1: Gather Materials

What you’ll need:
Black elastic http://amzn.to/2lmq6QG
Fabric scissors http://amzn.to/2lpapZM
2 rings
Needle & black thread
*Miaira is a participant in the Amazon Services LLC Associates Program, an affiliate advertising program designed to provide a means for sites to earn advertising fees by advertising and linking to Amazon.com.
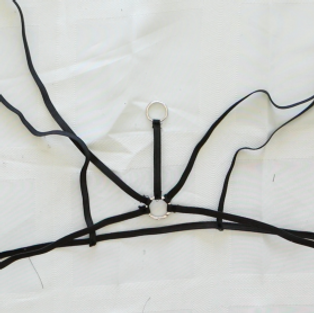
Step 2: Measure & Cut Elastic


First, wrap the elastic around your body, cut it to the correct length and tie a knot to temporarily hold it in place.
Then, measure out another piece that goes from the front center point, over the shoulder and to a point that meets the base elastic in the back. Cut that piece, then cut another piece of the same exact length for the other side. These will be your shoulder straps.
Next, cut a short piece that will connect the two rings in the front center.
Lastly, cut a piece that goes from the top of the short center piece to the top of one shoulder. Then, cut another piece of the same length for the other side.
Step 3: Attach First Ring


Take the base piece of elastic that wraps around your body and slip one end through the ring and fold it over. Then use your needle and thread to hand sew the end of the elastic onto the ring. Once the end is securely sewn, trim any excess thread and elastic.
Next, smooth the elastic out to make sure there are no twists and hand sew the other end of elastic onto the other side of the ring, closing the loop that will go around your body as the base of the bralette.
Note: When sewing, be sure that all short ends of the elastic are on the same side, as those will be on the inside against the skin and not visible when you put the bralette on.
Step 4: Attach Shoulder Straps


Take the pieces of elastic cut for the shoulder straps and hand sew them onto the top right and top left of the ring. Again, be sure that the short ends are all on the same side.
After that, smooth out and hand sew each piece to the back of the base elastic. Feel free to either mark evenly spaced spots ahead of time or eyeball it.
Step 5: Attach Second Ring


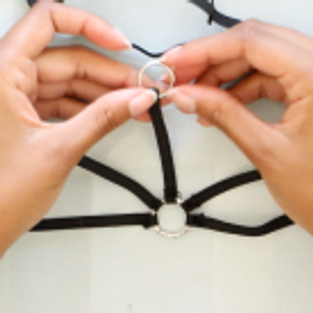


Now, take the short piece of elastic and hand sew it onto the first ring. Then, hand sew the other end of the elastic to the second ring. As before, be sure that the short ends are on the same side as the others.
Step 6: Attach Last Two Elastic Pieces


Now take the last two elastic pieces and hand sew them onto the top right and top left of the top ring. Remember to make sure the short ends of elastic are on the same side as the others!
Once that’s done, stretch each piece so that they reach the top of shoulder straps, trim if necessary, and hand sew to attach.
All done!

That’s it! Now you have your very own strappy harness bralette that will give extra flare to any low-cut top. Thanks for checking out this tutorial and please let me know if you try it out! 🙂
Full video:
Download the complete Instructables PDF here: https://www.instructables.com/id/DIY-Harness-Bralette/
Instagram: https://www.instagram.com/miairajennings/
Twitter: https://twitter.com/miairajennings/
Blog: https://livegrowglow.com
Website: http://miaira-jennings.com
#fashion #needleandthread #trend #fashionnova #women #design #bralette #sexy #plunging #cheap #sewing #prettylittlething #youtube #lowcut #doityourself #nosewing #style #project #nosew #handsew #blackgirlmagic #strappybra #outfit #cagebra #strappy #tutorial #harness #curlyhair #elastic #makeyourown #woman #blog #naturalhair #easy #harnessbra #simple #video #curls #fun #haltertop #handsew #sew #budget #DIY #pinterest #quick #halter #rings #howto #shirt #diy #pin #teen #trendy #top #trending #craft #instructables #photos #bra #cage


Comments