
DIY Product Photography Light Box
- Miaira Jennings

- May 31, 2017
- 2 min read
If you’re a blogger, ecommerce website owner or avid Instagrammer, you know how important it is to have high-quality images of products. Flat lays have become increasingly trendy, but seamless backdrops will always add an extra wow-factor to your product shots. Here are all the details on how I made my very own DIY product photography light box that creates some amazing, high-quality shots!

Step 1: Gather Materials

What you’ll need (some can be found cheaper at the 99 cent store/Dollar store!):
Cardboard box
White tissue paper http://amzn.to/2rH4lhu
Long construction paper of various colors/patterned card stock http://amzn.to/2qrxBEt
Box cutter/snap blade knife http://amzn.to/2qjYw9J
Double-sided tape http://amzn.to/2qqfluS
Scissors
*Miaira is a participant in the Amazon Services LLC Associates Program, an affiliate advertising program designed to provide a means for sites to earn advertising fees by advertising and linking to Amazon.com.
Step 2: Cut Flaps


Use the blade to carefully cut all four flaps off of the box.
Step 3: Cut Openings In Sides & Top


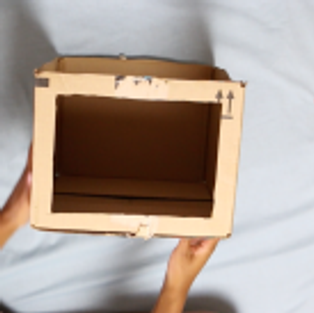


Use the blade to cut along the edges of one side of the box, leaving about an inch – an inch and a half around the border. Repeat the same thing to the other side of the box, as well as the top. You will now have 3 open panels through which the light will shine.
Step 4: Attach Tissue Paper


Measure and cut your tissue paper to fit the dimensions of the box’s sides and top. Then, use small strips of the double-sided tape in each corner to stick the tissue paper to the box. The tissue paper will act as a diffuser and soften the light for your photos. The more layers you use, the softer the light will appear (I’m just using one layer for this project).
Step 5: Add Backdrop


Now, take a sheet of the construction paper (I’m starting with this light pink) and tape the top corners into the inside of the box. This will create the appearance of a seamless backdrop for your photos.
All Done!


Now, just add lights and you’re ready to shoot! I’m using 3 studio lights that I already have (info on lights: http://amzn.to/2mcF39e) but you can also use regular desk lamps. Try this light box out with different backdrop colors, patterned card stock and even textured fabric. This is perfect for product shots for blogs, ecommerce sites, Instagram posts and more. I hope you enjoyed this tutorial and please let me know if you try it out! 🙂
Full Video:
You can also download the complete tutorial PDF from my Instructables post: https://www.instructables.com/id/DIY-Product-Photography-Light-Box/
Instagram: https://www.youtube.com/miairajenningstv


Comments